Building on from my last post, where I had the idea to create a three character fighting card game, I have fleshed out an initial design plan and started on the design document so that I can get the project underway. It’s taken me some time to get from the beginning of the project to this stage of having something in place for design work due to not wanting to simply replicate the Dunkora content that I designed for my second year Self Initiated Project, and I didn’t want to build around something that already existed, such as Magic: the Gathering, and sometimes it can be a little difficult creating content within a genre when you have to take into consideration the scope and number of different IP’s (Intellectual Property) that already exist. But I think I’ve gotten there with this concept.

First to clarify the title. Which is also the key design choice around this project. It fit for the title too, so I ran with it.

The Power of Three: 

The Power of Three is a term within Pagan and Witchcraft circles, and is a key part of the “Wiccan Rede” an oath and promise that every Wiccan takes upon becoming one.

The Wiccan Rede

“Bide the Wiccan Law ye must,

In perfect love and perfect trust,

Eight words the Wiccan Rede fulfil,

An ye harm none, do what ye will.

What ye send forth comes back to thee,

So ever mind the Rule of Three,

Follow this with mind and heart,

Merry ye meet and merry ye part.”

The Power of Three states that anything you do, or send out into the world, shall return to the sender three fold, hence the Power of Three.

And then I got to thinking about the Power of Three as I was conducting my research, and I came to the consideration that it could also be utilized as a means of designing a game, keep things within threes, or a multiple thereof, to create a simple yet effective card game that sets itself apart from most others.

With that in mind, I also decided to use the Power of Three as the title of the project, as a reminder of what I was working on, and also because it seemed to fit in with the theme of the design choice and the card game itself.


With that design process in mind, and with the theme in place, the rest of the project fell into place relatively quickly, so I got to work on the design document, taking note of anything that leaped to mind while I was working away. I came up with several different sections of the project, meaning that I know have a framework in place with which I can work on designing the cards for the game and creating a user testable product over the next few weeks.

Card Types:

As the project is in the form of a card game, there shall be a series of card types within the game:

  1. Character Cards: The players shall have three representative character cards presented in front of them at the start of the game. These are the main way in which the players shall interact with one another throughout the games they play. Character cards shall have a series of abilities that can be used within the stages of the turn.
  2. Rune Cards: These are the first type of card that shall be present within the 30 card deck that each player will have in addition to their character cards. These cards are used to enhance their characters and make the game more difficult for their opponents.
  3. Spells: As the deck is called the “Grimoire”, I have decided to create a card type called “Spell” so that players are able to “fling” damage dealing spells at one another’s characters. These shall not be a prominent card within the deck, they will be few and far between, but they shall be a significant threat within the game.
  4. Familiars: Witches are known to have a familiar or two somewhere about their home or person, and as such I want to incorporate a Familiar type card within the game to represent the creatures/animals that witches typically have. Familiars will be base cards with stats and no abilities, a way to add another layer to the game, in which familiars can be used to fight other familiars.

For the moment I am keeping the types of card limited down to just the three within the Grimoire, as well as the Character Cards, as a means of creating a simple test deck that I can use within user testing for feedback purposes, and it is also within the realms of the theme and design choice too, it is likely that there will be changes to the card types, and the way in which they interact with the Character cards, but for the moment I am of the opinion that three card types works rather well for this style of game.


Board Layout:

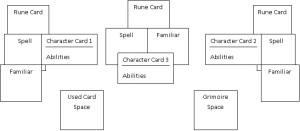
The players are presented with three character cards at the start of the game. I’ve opted for a tarot style board layout with the cards as it ties in with the over arcing theme, witchcraft, and offers the chance to create some interesting and different board layouts as the game is expanded.

Below is an example of a potential board, and the version that I intend to use when it comes to the user testing stage of the first prototype of the game.

Each character card has three card slots, in which the players shall be able to place a Rune Card, Spell, and Familiar. These cards can be used throughout the game to combat the opponent’s character cards, familiars and spells.

Board Layout Example


Player Turn:

There shall be several phases throughout the players turn in which they are able to perform actions; these are likely to change once user testing has been performed:

  1. Start of Game: Players each place their character cards on their boards and then shuffle their Grimoire. They then place their Grimoire in the Grimoire space of the board and draw a hand of 6 cards.
  2. Mandatory Draw: The player draws a card at the start of their turn from their Grimoire and adds it to their hand.
  3. Placement Phase: Players can place one Rune, Spell or Familiar from their hand into the appropriate space on their board, for any of their characters. Players cannot place more than one card per turn
  4. Offensive Action: The player can use their attack characters (Fighter/Elementalist) to deal damage to an enemy character.
  5. Defence/Heal Action: This action is reserved for the healer/support character, in which the player can use an ability of their healer/support to remove a wound from one of their wounded characters.
  6. Spell Action: Within this action, players can use the spells that are in place on their characters.
  7. Familiar Action: Within this action, any familiars that are in play can use this action to deal damage to an enemy familiar. If there are no enemy familiars present, the familiars can target enemy characters within this action instead.
  8. End of Turn/Discard Step: Players end their turn. Players cannot hold more than 6 cards at a time. If they exceed 6 cards in their hand, they have to discard down to 6, placing discarded cards into the “Used Card” space.

These are the first of the design choices that I’ve made for the project, a number of which are likely to change as the project is undertaken and the content begins to shape up. The majority of the changes will likely occur once the user testing stage has been reached, as the flaws of the design choices shall then become apparent and changes shall need to be made. But for the time being, I think this framework has given me plenty of design space for the project and for the product.
New Blog

Posted: October 7, 2014 in Uncategorized

In the interest of my resitting the second year. I have created a brand new blog in which to post my content on. The link for my Mind Games blog can be found below:


http://mindgames1342.wordpress.com/

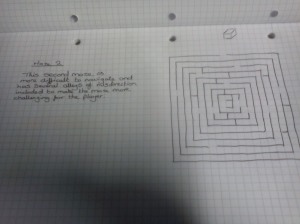
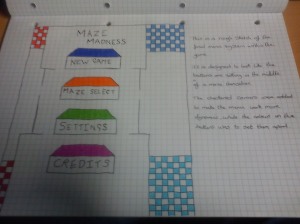
When it came to finally creating my game, I had several things to take into consideration, with it being a starter maze game, I needed to create a maze that was not overly complicated but at the same time not so simplistic that the player would be able to just breeze through it with no problem. Below are several screen caps of my initial designs for a couple of maze ideas along with a rough idea of a menu system that I had in mind.

SEMC 3MP DSC

SEMC 3MP DSC

SEMC 3MP DSC


These initial ideas were just things that were rattling around my head, I wasn’t sure whether I wanted a bright and colourful menu system sat in the center of a maze as is shown in the third image. I also wasn’t entirely certain on the mazes themselves as these are something that I haven’t worked on before so this was a rather unique challenge for me and was a welcome change in terms of design work.


Maze Menu Screen

Maze


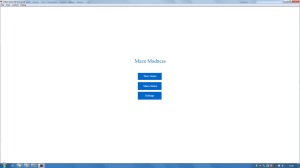
These two screen caps are of the final product that I created within Adobe Flash. The menu is fairly simplistic in the design, I didn’t want to use anything overly bright and colourful in the end, which is where it differs from my initial idea. While the menu is basic in appearance, it does what I wanted it to do and it leads straight to the first maze of the game, which is represented by the second screen shot that is showing the maze design I worked with. The maze design I worked with is present within the first screen shot of my initial designs and I felt that this was the better of the two mazes to work with in my game as a starter level while the second one has more misdirection and ways to lead the player down the wrong alleys while the first one is a much better blend between misdirection and being able to complete it within a short time and progress.


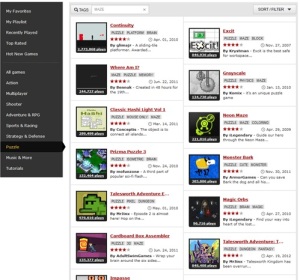
The first thing I did in terms of research for the Maze Madness project was look into various different types of maze flash game that appear on the internet. Using prior gaming knowledge of Flash Games, I uploaded the website www.kongregate.com so that I could look at the different maze games that it had to offer before I started planning my own game.

Kongregate


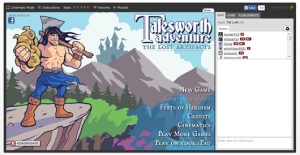
Looking at a maze game called Talesworth Adventure: The Lost Artefacts, I made sure to note how the menu system was displayed on the main page of the game as I need to make sure I know what to be working on within my own designs for the maze game.


Tales


The levels themselves were set out so that the player had to work out where to place items within their inventory in order to guide their characters avatar through each level without them falling into pitfalls and traps that have been placed around the level map. As the player progresses through each level and moves onto the next one, the difficulty increases and they have more traps to work around to keep their character safe, using only the items in the inventory that they are offered for that level.

Level 1


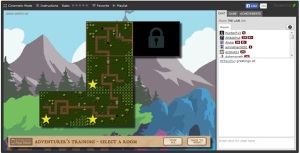
There is a nice little feature within the game. When the player clicks on the map button within the game, which will bring up the “map” which is in fact all of the mazes the player has navigated, showing them in the shape of what I would describe as “Tetris Pieces” although of course it is likely just a design choice by the creator of the game.

Level Layout


Labyrinth Runner

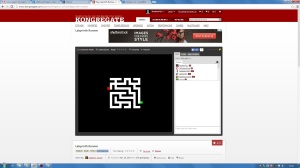
This is another Maze Game from the game site Kongregate. It is a much simpler game than Talesworth Adventures, with only a set of levels to choose from and a colour for the characters avatar as the only options for the game itself.

Lab Runner


While the mazes become more difficult as the player progresses through the levels there is little variation within the game itself. The game is filled with basic colours, such as the different ones that can be chosen for the character colour while the mazes themselves are set in white on a black background, basic colours that are none the less effective in placing the players attention on the maze.

Level 2

Additional Project Proposal

Name: Maze Madness (Working Title
Genre: Maze
Game Type: Flash Game

There are three goals that I shall have achieved by the time the project is finished:

  1. To have a working game with a maze level and working menu system.
  2. To have a working maze selection so that the player can choose which maze to tackle.
  3. Working character avatar (Circle) that can be directed through the maze.

Research

In terms of research, I shall be looking into existing maze games and their menu setups. It is also understood that there are many different types of maze games with many different forms of challenge for the player to undertake, and so through looking at these different games, I will be able to find and maybe incorporate different challenges into the project design in order to offer the player something different and challenging. I shall also be researching mazes that exist in real life, such as the maze that is situated outside of York.

Development Programs

The main program I shall be using will be Adobe Flash.

Proposal for the Self-Initiated Project

The project that I plan to undertake is a Games Design document for a Cyberpunk themed digital Roleplaying Game. I chose this because my primary interest within games design is that of becoming a games writer and I feel that creating a comprehensive design document will give me the chance to delve deeper into the writing side of the industry.

There are other elements that I need to take into consideration with the design document, an example of which would be the visuals that will need to accompany the text within, therefore I shall be utilizing and expanding upon my skills within 2D and 3D visualization to creating visual representations of my designs, thereby creating a dynamic and visually pleasing project piece while also being able to create gameplay aspects for the project, looking into the mechanics and taking into consideration Aspects of Play so that the viewer can engage with the final product.

In order to expand within the project, I shall also be creating a blog based website that I can utilize to expand upon the game aspects of the project, displaying character and location information, backing up each with visuals such as images and models, thereby offering more to the viewer than just the design document as the final product.

The website would be updated with information and visuals as the project moves along, with sections being added as information becomes available, with regular screen shots of the website being taken so as to record the progress of it and the project as a whole. I would also be able to create interactions within the website sections, offering gameplay examples and even small demonstrations of gameplay as the project progresses over the course of the year and beyond. This would further utilize and expand my skills within 3D and 2D visualization, as I would be able to create small sections of gameplay, displaying some of the game mechanics within.


Within the research part of the project, I will be looking into Cyberpunk as a genre, so that I can encapsulate elements and themes from it into my project, capturing the style and essence makes the genre so popular and visually stunning.

This means that within my research document, I will be making note of films, such as:

  • Total Recall
  • Blade Runner
  • The Matrix Trilogy
  • Johnny Mnemonic

I will also take into consideration for research, several games that are classed within the genre, such as:

  • Deus Ex: Human Revolution
  • Android: Netrunner
  • Shadowrun
  • Watch Dogs
  • Final Fantasy VII

Then of course, I shall also be researching existing Authors and Games Writers and examples of projects that they have worked on and created themselves, such as:

  • Steven Ince
  • Rhianna Pratchett
  • William Gibson
  • Henry Darger
  • Darby McDevitt

I shall also be looking into expanding my skills with 3D modelling software 3DS Max in order to create the modelling visuals that will need to accompany the document and be placed on the website throughout the project.


Goals

There are several goals that I want to achieve with this project, building upon the skills that I have learned and improved upon in the first and second years, these goals are:

Primary:

  • Create extensive design document. Back up information with visuals.
  • Create a blog based website to compliment the document
  • Create gameplay elements and mechanics
  • Expand upon written and 3d visualisation techniques
  • Critique project progression throughout, making sure to take notes of changes made throughout. Write up such in extensive blog posts.

Secondary:

  • Implement interactive elements into the website
  • Incorporate user testing for interactive elements

User Experience

3.1. Audience

The game that I will be creating within the design document is set firmly within the Cyberpunk genre. Through my research I have found that the majority of Cyberpunk themed films and games are set to age ranges 15-18, while at the same time, finding that Role Playing Games tend to be aimed more at audiences of 18-35 years of age. I feel that it would be best to set my target audience at ages 18-35 to not only fit in with the target ages that I discovered, but also due to the nature of some of the content that could be within the document.

3.2. Competitive Analysis

Working on games design documents within the past has given me a basic understanding of how to structure them. However, as this is a third year project, I will need to be much more expansive and cover many different sections, backing each one up with visuals that are relevant to that section, along with explanations and discussions of the thought processes throughout. I will need to look into how to create the blog based website, as I have only ever created basic blog posts before and am not entirely sure on how to produce the proposed element, however I’m sure that with the right research and practice, I shall be able to overcome this problem and produce the website as it is needed.


Critical Analysis

For my dissertation I plan on building upon my experiences with Cyberpunk and the skills I have learnt over the first and second years to design portions of the game that I intend to write within the design document, such as using 3DS Max to create the Corporation buildings and use Photoshop to create a HUD and menu system.

I will also be using the time to learn how to create a blog based website within WordPress, as I have used it over the first two years to create blog posts for university work, but utilizing it within this way, within the project itself, I can utilize it to create different sections that pertain to a certain part of the project, with simple navigation and interactive elements.

Project Content

5.1 Content

Within the design document, there will be many sections that I will be creating for the product within, the breakdown of which is:

  • The Setting
  • Locations
  • Antagonists
  • Protagonists
  • Items
  • Abilities

These sections within the design document will be well detailed, with explanations for abilities and items, descriptions of locations, along with histories and back stories for both locations, characters and the setting in which the product is placed.

I will be able to utilize these settings not only as headings within the document, I will be able to break them down and create them as sections within the website as well, being able to offer visuals and information for each, with interactive elements in the correct sections as well.

5.2 Functional Requirements

The majority of the project will be created within Microsoft Word, however, there may be elements of the project that require the use of Adobe Photoshop and 3DS Max. By the end of the project, I intend to have a detailed and comprehensive design document printed for viewing. I will also be utilizing WordPress as a means of creating the blog based website.


Project Structure

This is a rough timetable, showing the work that I will be doing and the period of time that it will take to complete. This is just an estimated amount of time for each section, as I’m sure some sections will take longer than others, however once I know more of the period of time each section will take to complete, I will update the chart accordingly and expand it so that it covers my progress on a weekly basis and I will expand it as necessary as new sections of the product are created and added.

Task Start Date Duration (Days) End Date
Research 09/06/2014 12 09/07/2014
Website Set up 09/07/2014 12 21/07/2014
The Setting 13/07/2014 9 22/07/2014
Locations 22/07/2014 9 31/07/2014
Antagonists 31/07/2014 12 12/08/2014
Protagonists 12/08/2014 12 24/08/2014
Items 24/08/2014 12 05/09/2014
Abilities 05/09/2014 12 17/09/2014


Visual Design

7.1 Design Sketches

7.2 Screen Mock Ups

7.3 Prototypes

(I currently have no visuals for the project)

Development Schedule

When it comes to the development schedule, I plan on using a timetable to track my progress throughout the project, marking off each week and writing up the progress that has been made with regular blog posts, detailing the work that has been produced and offering examples in the forms of screenshots and examples of visual work that has been produced.

As the project progresses, if there are any timetable changes that need to be made then I will make the changes to the timetable that I have set and then I can update it on the blog as well, explaining why the timetable had to be changed.

Appendix

Steven Ince (Games Writer) – htttp://www.steve-ince.co.uk

Steven Ince Twitter – http://twitter.com/Steven_Ince

Rhianna Pratchett Twitter – https://twitter.com/rhipratchett

Rhianna Pratchett (Games Writer) – http://www. Rhiannapratchett.com/

So now that the self initiated project is over and done with, I want to address several key things, especially the way I handled the workload and how I seem to have lost my way with it towards the end.

Firstly, I was way too ambitious with my project proposal. Wanting to model and texture an entire cityscape in a certain style was way too ambitious considering I had a very limited set of modelling skills going into it, but on top of that I feel that I always take on more than I can handle and this is the reason why I tend to fall back on such escapes like writing a back story for just about everything, even if a back story isn’t even necessary in the first place, as I did in this project when it came to creating the Corporation buildings. I created two Corporations, gave them names and a basic back story so that when it came to creating their headquarters, I would be able to visualize it instead of just going into 3DS Max and getting on with it, because I could have easily created a lot more work if I had just gotten sat down, focused, and worked my way through the models instead of sweating the details.

The second thing I really do need to address in regards to the project is my lack of management skills. I planned initially to create either a timetable or some sort of organisational chart so that I could write down and record my project from week to week, setting myself targets and getting on with the work that needed doing, balancing it against the Client Project, which in the end seemed to take up the majority of the time, while the rest of the time I was dead in the water worrying about the research side of my project, and the written side, instead of once again getting on with the practical side, which was actually the more important side to it. In the future whenever I undertake a project like this again, I will make sure that once I know what I am doing, before I go anywhere near anything such as research or modelling, I need to sit down and create a time chart for myself and force myself to make notes of what I need to do and make lists so that each week I can tick off my progress and move onto the next step. This might also help me keep motivated and focused, as these are two other concerns that I have when it comes to my work, I can keep working for a while, but then I become unfocused and tend to switch over to doing something else and leaving the work that needs completing half finished in order to pursue something else. It’s unprofessional and I intend to spend the summer working on my attitude towards my work so that I can go into the next year ready and willing to just get stuff done.

On a more positive note however, I feel that as a 3D modeller, while I am still learning and improving upon my designs, I have actually improved a lot from when I first started the second year and especially the second semester with the return to the Client Project and the start of this Self Initiated work. I have picked up a number of different modelling techniques through the help of other members of the group along with searches on the internet if I need extra help with anything and I feel that I am slowly coming along to be a half way decent modeller. The downside of course is that I need to work on my texturing skills, as even though they have improved to a slight degree, they are still a long way from being adequate and so I need to spend more time just modelling and practicing, making sure I don’t get side tracked from my goals in the future.

I think that for the next time I have to do a project like this, which will be the case in the third year with my Final Major Project, I will be putting the work in over the summer to make sure I can drag my skills, motivation and focus up to adequate levels so that when I do go into the third year, I am prepared and ready to just sit and get on with work, instead of getting side tracked by the slightest thing. While I certainly aren’t happy with the way my self initiated worked out in the end, I have found many things that I can work on and improve upon and so this should help me progress as a designer in the future as I intend to act upon the feed back that I have recieved.

Corporation Memorial


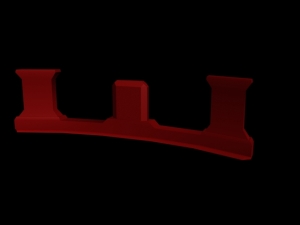
I’m not really sure where I was going with this, it started off as a simple box and I really just started to see what I could create. I wanted to create some sort of memorial wall or another type of large memorial thing in commemoration for the Corporate forces that lost their lives in the early in the struggle for world dominance. This render however isn’t really something I was working towards and I feel that it would take up more space than anything else as it’s quite wide and has a slight curve to it. It might serve as something else later down the line, but I think that it might be better to just create something else.

Corporation Building


This is the first of my three Corporation headquarters buildings. It isn’t the best design I’ve come up with for a Corporation building, but it certainly stands out and is rather striking in the backdrop of the city scape. While I have yet to texture the building, I find that this is probably my favourite one so far, mostly because it isn’t really a conventional building shape and with there being two doorways on the top floor of the building to the roof, which I might alter so that it only has the one exit and a helipad instead, so that there is a sort of CEO access through the roof, or maybe I could rail it off and put a roof garden, although this is less likely as it is a Corporate building and would be void of such things.


Advertising Stand


This is the first of the advertising stands that I will be placing within my game level. Simple yet effective in design, I can place this in several places around the city scape I am designing, replacing one advertisement on the screen with another as I go along, so that there are several different advertisements for users to view as they walk along.

I say that this is the first of the advertising stands because I plan on creating two or three more of them, depending on how far I progress with the other buildings that I need to create for the level, as there is quite a list and time is rapidly running out.